Friday, October 1, 2010

Arugula Salad with Raw Sweet Corn and Cherry Tomatoes


For health reasons, I went on a raw vegan diet recently. I know it doesn't sound too enjoyable, but on the contrary, I've actually discovered lots of delicious raw foods and I am also rediscovering how much I love salads! Plus, my digestion has improved greatly and I'm feeling more energetic lately, among a lot of different signs that my health is improving. I even found out a few days ago that red meat passes so slowly through your digestive system that often it ends up rotting in your intestines before it's fully digested (though much of this can be prevented by adding more fiber via fresh fruits and vegetables in your diet). That's not to mention a fact well known by now that regular consumption of red meat significantly increases the risk of cardiovascular disease and even cancer. I also found out that fresh fruits and vegetables have natural enzymes in them that aid your body in digesting them efficiently, whereas cooked fruits and vegetables have had much of their nutrition cooked out of them. Suffice it to say, now that I've learned all this, I will probably be eating much less red meat after the raw vegan diet is over, despite the fact that I love red meat and used to eat it all the time (at least once a day). And although meat does contain protein, which is important to a balanced diet, nuts are a healthier source of protein since they don't contain the high levels of unhealthy saturated fats found in red meat and instead contain high levels of healthy fats, such as monounsaturated fat, polyunsaturated fat, and omega-3 fatty acids.

There are actually certain foods I prefer raw and other foods I prefer cooked, but corn is definitely one of those foods I prefer raw. Corn is so flavorful in its raw state that I prefer to eat it raw than eat corn on the cob the traditional way. Cherry tomatoes are also incredibly flavorful in its raw state and lose much of its flavor once cooked. Remember not to refrigerate the cherry tomatoes since it will lose its flavor quickly and the flesh will turn mealy and unappetizing; just store them in a cool place. The original recipe called for Sweet 100 tomatoes, a type of cherry tomatoes, but any type of cherry tomatoes will do. The combination of sweet raw corn and sweet cherry tomatoes is bliss!

Arugula Salad with Raw Sweet Corn and Cherry Tomatoes
From The Zuni Cafe Cookbook

Ingredients:
• 4-5 ounces Sweet 100 or other small, ripe cherry tomatoes (or about 1 cup or 25 tomatoes)
• 2 very young, small ears white corn (or about ½ cup kernels)
• 5 tablespoons extra-virgin olive oil
• 1 tablespoon Champagne vinegar or white wine vinegar
• 1 small shallot, finely diced
• 4 ounces arugula, carefully washed and dried
• Salt and freshly ground black pepper, to taste

Directions:
1. Stem, wash, and dry the tomatoes and cut them in half. (The serrated bread knife is especially good for cutting tomatoes, so if you eat tomatoes frequently, it's a worthwhile investment.)
2. Shuck the ears from the corn and remove all the silk. Trim the tip from each cob but don't remove the stalk as it makes a convenient handle. Holding the cob at an angle, use a sharp knife (such as a chef's knife) to slice off the kernels, placing the blade flat against the ear and sliding it smoothly down the length of the ear. You'll want to remove the kernels at their bases without removing any of the actual cob itself. Rotate the ear after each slice, until all the kernels have been removed. Crumble the kernels between your fingers so as to separate any clusters.
2. Combine the oil, vinegar, shallot, and salt and pepper to taste. Place the arugula in a salad bowl and toss with enough vinaigrette to coat the leaves well. Scatter the cherry tomatoes and corn kernels over the arugula, add the remaining vinaigrette, and lightly mix. Taste, and correct the oil, vinegar or salt. The vinaigrette shouldn't be too acidic so as to overpower the sweetness of the corn and cherry tomatoes. Serve immediately.

Sunday, September 19, 2010

Sea Bass With Potatoes, Leeks, and Thyme


Another winner from the Zuni Cafe Cookbook! You can use black bass, turbot, or any type of sea bass, though I used striped sea bass from the Union Square Greenmarket. Since the fillet needs to be 1-1½ inches thick in order to cook properly, avoid the tail pieces. The chunky stew of leeks and potatoes pairs extremely well with the mild, sweet flavor and firm, flaky texture of the sea bass I used - I would definitely make this dish again!

Sea Bass With Potatoes, Leeks, and Thyme
From The Zuni Cafe Cookbook

Ingredients:
• 4 pieces sea bass fillet, about 6 ounces each and 1-1½ inches thick
• sea salt, to taste
• About ¾ pound peeled yellow-fleshed potatoes, preferably yellow Finnish, Bintje, or German Butterballs, cut into irregular bite-sized chunks (I used fingerling potatoes)
• 1-1½ cups diced or thinkly sliced leeks (including a little bit of the green part)
• A few sprigs of fresh thyme
• About 1¼ cups chicken stock
• A splash or two of dry white vermouth
• 6 tablespoons unsalted butter, sliced and chilled
• A trickle of Champagne vinegar or white wine vinegar, if needed

Directions:
1. Season the fish lightly and evenly with salt. Cover loosely and refrigerate. For best flavor, do this a few hours in advance.
2. Preheat the broiler. Position the rack so that it's about 6 inches from the heating element. Place the potatoes in the saucepan, add cold water to cover, and turn the heat to medium. Season liberally with salt, stir, and taste - the water should be as seasoned as you'd like the potatoes to be. Cook the potatoes at a gentle simmer until tender and soft on the edges, about 5 minutes.
3. Drain the potatoes well and place them, still steaming, in a 12 or 14-inch ovenproof skillet. Add the leeks, thyme, about 1 cup of the chicken stock, and a splash of vermouth. Set the heat at medium and swirl as the broth starts to simmer. Add about 4 tablespoons of butter, and swirl until it melts. Taste for salt.
4. Reduce the heat to low and add the fish. Swirl and tilt the pan to baste the surface of the fish with the buttery broth. The liquid level should rise as the bass releases its juices into the broth, but if it doesn't, add more chicken stock. Make sure no bits of leek are stuck to the sides of the pan or on top of the fish, and place the pan under the broiler. Cook until the surface of the fish and potatoes is lightly gratinéed (browned), about 5-6 minutes. The liquid should be bubbling vigorously at this point.
5. Reduce the oven temperature to 500°F and cook until the fish is medium-rare, another 1-5 minutes. Transfer the pan to the stovetop and using a spatula and tongs, lift the fish, and place on a platter side by side (don't stack the fish on top of one another). The fish will finish cooking as it rests.
6. Swirl the pan gently over medium heat so that the sauce thickens as it simmers. Taste, and add the remaining butter and adjust the salt. Drain any liquid on the platter of fish into the simmering sauce in the pan. Allow the sauce to reduce until it is somewhat thick. Taste, and add a splah of vermouth or a few drops of vinegar, if it tastes flat. Transfer the fish to plates, and spoon and potato-leek sauce over the fish. Serve immediately.

Saturday, September 18, 2010

Roast Pheasant and Pheasant Sausage Braised with Grapes


I love doing unconventional things with conventional ingredients, and while grapes are usually eaten in their fresh state, they are delicious baked into tarts or in this case, fried (yes, fried) and reduced into a sauce that compliment the spicy sausages in this dish perfectly. The idea came from the Zuni Cafe Cookbook, where there is a recipe for quail and sausage braised with grapes, a modern take on the traditional Umbrian dish called Salsiccia all’Uva. I couldn't find any quail at the Union Square Greenmarket today, so I chose another game bird instead - pheasant. And although the original recipe called for cooking the quail on a stovetop, I roasted the pheasant since whole pheasant is much larger than quail and cooking it on a stovetop would have been impossible. I also used spicy pheasant sausage, though Rodgers did suggest fennel sausage (which is usually pork). In fact, so much was changed from the original recipe, I can't really say that my recipe was adapted from hers; 'inspired by' is probably a more appropriate term in this case.

Choosing the right type of grapes is important to this dish. It is traditionally made with wine grapes (not seedless) and is supposed to result in something a bit crunchy due to the seeds, but at the Zuni Cafe, they use mostly seedless grapes, such as Black Emerald or Red Flame grapes. I chose small red and black seedless grapes at the farmer's market (I don't know what varieties they were), but whatever variety or varieties of grapes you choose, you want to make sure they aren't too sweet because it will result in sauce so sweet that it's cloying. Small grapes cook down the quickest and produce the best flavor and texture.

Another important note about this dish is that it's best eaten immediately because the grape sauce loses its flavor and the pheasant and pheasant sausages may dry out.

I really enjoyed this dish, although the roast pheasant came out a bit dry but probably because I wasn't diligent enough in basting it frequently. It's actually not a difficult recipe to follow at all, however, so I'll have to try this recipe again but with quail next time and see what results. I've only had quail a handful of times in my life but what a treat it was when I got to have it!

Roast Pheasant and Pheasant Sausage Braised in Grapes
Inspired by The Zuni Cafe Cookbook

Ingredients:
• 2 whole pheasants, about 2½-2¾ pounds each
• About 6 tablespoons extra-virgin olive oil
• sea salt, to taste
• a few pinches of fennel seeds, barely crushed
• 4 fresh pheasant sausages (3-4 ounces each)
• About 2 pounds (or 5-6 cups) small, red or black seedless grapes
• 2 teaspoons balsamic vinegar or lemon juice

Directions:
1. Preheat oven to 350°F. Rinse and dry the pheasant thoroughly. Rub it all over with salt and crushed fennel seeds. Also pour olive oil all over.
2. Place the pheasant in a shallow roasting pan, just large enough to hold it comfortably, and roast it in the oven for 30 minutes. Remove the pheasant from the oven and baste the pheasant with its own juices. Cover it loosely with foil, and continue roasting for l½ hour, turning it every 15 minutes and basting it with the pan juices.
3. Cover a non-stick pan with olive oil and place a few pinches of crushed fennel seeds, then add the grapes. Stir regularly, until the skins split and release the grape juices. Cook uncovered, stirring occasionally, for about 20-30 minutes. If the grapes are too sweet, add a pinch of salt and/or a little vinegar. Place the sausages in a large skillet and turn heat to medium. Cook sausages for about 15 minutes, about 3-4 minutes on each of the 4 sides. When they are brown all over, reduce the heat and pour off most of the excess fat. Then add the grapes. Turn down the heat to medium-low and cook, stirring occasionally, for another 10 minutes or so, or until the sauce has been reduced to a rich jam.
4. When the pheasant is done cooking, remove it from the oven and allow to rest for about 15 minutes so that the juices have time to settle. Use poultry shears to cut the pheasant into serving pieces. Stir the pheasant in with the sausage and grapes. Serve immediately, as the pheasant and pheasant sausage will become dry if reheated.

Friday, August 20, 2010

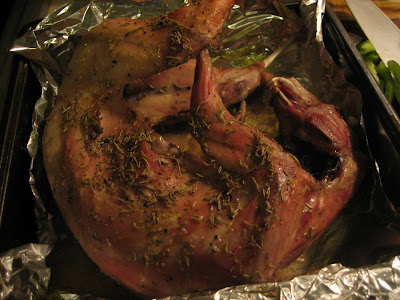
Roasted Garlic-Rosemary Rabbit


Rabbit is one of those meats that when people have for the first time, they say "hey it tastes just like chicken". Although it does taste similar to chicken and is cooked in the same way, it actually has a milder flavor and is more tender. The rabbit is best roasted and eaten almost immediately, since it's a particularly lean meat and therefore dries out easily. It has the highest percentage of protein and lowest percentage of fat compared to chicken, veal, turkey, lamb, beef, and pork at 20.8% protein and 4.5% fat. It's a very healthy and delicious meat, though difficult to find - I chanced upon mine at the Union Square Greenmarket last Friday when John Fazio Farms was there selling rabbits and ducks, but as far as I know, they're only there in the summertime. By the way, as with chicken, you'll want to choose a smaller size rabbit since the younger the rabbit was when it was killed, the more tender and succulent the meat will be.

Since this was my first time cooking rabbit, I was a little nervous, but I'm glad I gave it a shot because I was pleased with the results! The Zuni Cafe Cookbook has a recipe for rabbit sausage which I may just have to try making (that is, if I can actually find lamb casings.)

Roasted Garlic-Rosemary Rabbit

Ingredients:
• 2½-2¾ pound whole rabbit
• 10 small garlic cloves, peeled and pressed through a garlic press
• 6 tablespoons extra-virgin olive oil
• salt and freshly ground black pepper, to taste
• 2 sprigs fresh rosemary, or 1-1½ teaspoon dried rosemary
• ¼ cup white wine
• 3 tablespoons lemon juice

Directions:
1. Preheat oven to 325°F. Rinse and dry the rabbit thoroughly. Rub it all over - both the inside and the outside - with the garlic, rosemary, salt, pepper, and olive oil.
2. Place the rabbit in a shallow roasting pan, just large enough to hold it comfortably, and roast it in the oven for 30 minutes. Remove the rabbit from the oven and pour the wine and lemon juice over it, if you desired. Also, baste the rabbit with its own juices (it helps if you have a baster). Cover it loosely with foil, and continue roasting for l hour, turning it every 15 minutes and basting it with the pan juices.
3. After an hour, increase the oven temperature to 450°F and uncover rabbit. Roast for another 15 minutes, or until deep golden brown. Baste often with the pan juices to keep meat succulent, turning once or twice for even coloring.
4. Use poultry shears to cut rabbit into serving pieces. Arrange on the platter with sprigs of rosemary, and drizzle the rabbit with its pan juices, if desired.

Wednesday, August 18, 2010

Ribeye Steak with Salmorigano and Haricot Yaune


I was so excited when the Zuni Cafe Cookbook arrived in the mail yesterday because it's won the James Beard Foundation Cookbook of the Year award and IACP Cookbook of the Year award. Also, the restaurant won the James Beard Foundation Restaurant of the Year, and Judy Rodgers (who founded Zuni Cafe and wrote the book) won the James Beard Foundation Best Chef of the Year award. Not only do the recipes look delicious, the cookbook is very well-written and include many helpful details for the home cook, a glossary for ingredients, and even wine pairings for each main course (a nice touch for those who drink alcohol, though I currently can't). It's also a natural transition from the Alice Waters style cooking that I've been doing for the past year or so - French and Italian influenced Californian cuisine with a focus on fresh, seasonal, and organic/natural ingredients. Judy Rodgers actually interned at Chez Panisse at one time before she started Zuni Cafe.

The first recipe I decided to make was salmorigano, which is a salsa-marinade that can be used for marinating meat, or as a sauce for cooked food, such as fish or roasted or grilled vegetables (tomatoes, peppers, onions, eggplant, etc), or even as a sauce for grilled bread. It's traditionally made with fresh oregano, but this version of it uses dried oregano. I used salmorigano to marinate pieces of ribeye (one of my favorite cuts of meat) overnight - it definitely didn't disappoint! I paired the ribeye with haricot yaune (the yellow version of haricot vert) which was sauteed with onions and lavendar peppers.


Black and lavendar peppers from the Union Square Greenmarket

A few tips when buying steak: a) Look for lots of marbling (thin threads of fat throughout the meat) - marbling means fat which means flavor b) It should be about 1-1½ inches thick so that it doesn't dry out while it's being cooked c) Grass fed, naturally raised beef is your best quality meat, but if not, go for USDA Prime; and if not Prime, then Choice (one level below Prime). d) The best cuts are filet mignon or tenderloin (the most tender and expensive cut, though not the most flavorful), ribeye (well marbled, one of the juiciest and most flavorful cuts), New York Strip (best cut for grilling), Porterhouse (a combination of New York Strip steak on one side and tender filet on the other), and T-bone (very similar to a Porterhouse steak, except with less of the tenderloin muscle.)

Ribeye Steak with Salmorigano and Haricot Yaune
Adapted from The Zuni Cafe Cookbook

Ingredients:
• 4 ribeye steaks, 1-1½ inches thick, about 10 ounces each

• 1 pound haricot yaune, washed and stems trimmed (or if you can't find them, substitute haricot vert)
• 1 bell pepper, washed diced (I used lavender pepper, but you can use any color - preferably red, orange, or yellow, as green ones lend a bitter rather than sweet flavor)
• 1 red onion, peeled and diced

Salmorigano
• 12 small garlic cloves
• About 1½ cup extra-virgin olive oil
• ¾ teaspoon salt
• ¾ teaspoon freshly ground black pepper or chili pepper flakes\
• 3 tablespoons dried oregano
• 1½ lemons, halved
• 6 tablespoons simmering water

Directions:
1. Remove your steak from the refrigerator at least 30 minutes before you plan to cook it and allow it to come to room temperature, since a cold steak will contract when it hits the heat and cause it to toughen. Preheat your oven to 425°F.
2. Salmorigano: Peel and crush the garlic in a garlic press. Add a pinch of salt, then add the oregano, oil, and black pepper or dried chili. Stir the mixture to combine. Just before using, add the simmering water, squeeze in the lemon juice, whisk, and taste. The sauce shouldn't be too tart or sour so as to overwhelm the other flavors. If you're using it as a marinade, allow each piece of steak to soak in the mixture for up to 1 hour.
3. Haricot Yaune: Sauté the onion in a non stick pan on medium high heat for about 10 minutes until it begins to caramelize. Then add the haricot yaune and sauté for 10 minutes more until they are soft. (I prefer them a bit on the softer side, so sauté for 6 or 7 minutes if you prefer them a little crunchy.)
4. Preheat a skillet to medium high heat. When it's hot, drop the steak in the skillet and sear each side for 30-45 seconds, depending on its thickness. Then place the steak in the oven for about 10-12 minutes, again depending on its thickness - this will produce a medium rare steak, so leave the steak in for longer if you prefer a steak that's more well done. Remove the steak and allow it to rest for about 5 minutes to let the juices settle before serving with a side of haricot yaune and caramelized onions.

Wednesday, August 11, 2010

Wild Mussels in Heirloom Tomato Basil Sauce


Hello hello! So if you've been following along in my blog, I'm sure you've noticed that many of my most recent entries are of seafood - however, surprisingly, I still haven't done an entry on any type of small shellfish, such as clams, mussels, shrimp, and oysters. Nothing beats the taste of fresh shellfish, so it's about time for this simple but yummy recipe for wild mussels! You do have to be careful in the summer months to make sure these sea creatures remain as fresh as possible though. When I buy them at the local farmer's market, I always remember to ask them to give me a bag of ice, just to make absolute sure that the seafood stays fresh on my way home. And they really have to be eaten within 2 days max; the sooner you eat them, the better. I had bad mussels once (past 2 days of purchase) and my stomach complained about it for hours afterwards; that was NOT fun. Oh and one other thing, mussels are always sold live and they need to breathe. So when you get home, whatever you do, don't put them in an airtight container or the vegetable drawer or they will all suffocate, and a dead mussel is not a mussel you want to eat.

The sauce is a riff of the simple tomato sauce I'd posted earlier except this time, I stirred in some fresh basil a couple minutes before I turned off the heat. I also used the most delicious heirloom tomatoes from the Union Square farmer's market - look at all the variety (there's even purple tomatoes)!


Anyhow, as my 5th grade teacher used to say before lunch (funny how I still remember this but I'll forget stuff that happened yesterday)... Bon appetit, time to eat! :)

Wild Mussels in Heirloom Tomato Basil Sauce

Ingredients:
• 4 pounds mussels, scrubbed and debearded

Simple Tomato Sauce

• 2 pounds sweet, ripe greenhouse tomatoes, washed, chopped, and seeded
• 2 tablespoons extra-virgin olive oil
• 3 garlic cloves, peeled and pressed through a garlic press
• 1 large red onion, diced
• 1 teaspoon salt
• Fresh basil
• Fresh parsley (optional)

Directions:
1. Tomato sauce: Warm the olive oil in a sauce pan over medium heat. Cook the onion, stirring occasionally, until softened and slightly browned, about 5 minutes. Add the garlic and let it sizzle for half a minute. Stir in the chopped tomatoes and salt.
4. Bring the sauce to a boil. Then turn down the heat to low and cook for 30 to 45 minutes at steady simmer, or until the fat floats free from the tomato and the sauce thickens, stirring occasionally.
5. Taste the sauce and add more salt, if necessary. Stir in the fresh basil and turn off the heat after a couple minutes.
6. Hold each mussel under cold running water. Use a brush with stiff bristles to thoroughly scrub the mussel and remove grit, sand, and mud from the shell's exterior. Wild mussels usually have a dark, shaggy beard extending from each shell. After scrubbing each mussel, pull the beard away from the shell until taut, and then pull the beard down sharply toward the dark hinge. It should snap away easily. Removing its beard will kill the mussel, so perform this step just before cooking them.
7. Add the mussels, cover, and stream until they are open, about 5-7 minutes. Shake the pot, holding down the lid with a kitchen towel, to redistribute the mussels. Discard any mussels that do not open because this indicates that they have died. Place the mussels in a plate, then pour the warm tomato basil sauce over them. Garnish with fresh parsley, if you wish.

Friday, July 9, 2010

Wild Mahi Mahi with Artichoke Mashed Potatoes


Wild Mahi Mahi with Artichoke Mashed Potatoes
Adapted from Alice Waters' Chez Panisse Café Cookbook

Ingredients:
• 4 6-8 ounce wild mahi-mahi fillets, preferably premium center-cut
• 3 large artichokes
• Juice of ½ lemon
• 3 garlic cloves
• Thyme sprigs
• Extra-virgin olive oil
• Salt
• 2½ pounds Russet potatoes
• 2 tablespoons (¼ stick) butter or duck fat (you can substitute extra-virgin olive oil if you're trying to be healthy)
• ¼ cup half-and-half (optional; or you can substitute nut milk or other non-dairy milk if you're lactose intolerant)
• White wine vinegar
• Freshly ground black pepper

Directions:
1. Pull off the outer leaves of the artichokes until you reach the tender yellow central leaves. Cut crosswise through the leaves about 1½ inches above the base, and cut off all but an inch of each stem. With a paring knife, cut away all the deep green, down to the heart. Scoop out the chokes with a teaspoon. Drop the trimmed artichokes into water acidulated with lemon juice as you work. If you're still confused about how to prepare artichokes, Here is an extremely helpful step-by-step guide to how to prepare them, including photos for each step.
2. Cut the artichokes lengthwise into slices about ½ inch thick. Peel and smash the garlic. Put the artichokes, garlic, and a few thyme sprigs in a sauté pan with a generous amount of olive oil and season with salt. Stew over medium heat until quite tender; the artichokes should brown slightly. Drain and save the oil. Remove the thyme sprigs. Roughly chop the artichokes and set aside. Preheat the oven to 350°F.
3. Peel the potatoes and cut them into cubes. Boil in generously salted water until soft. Put the potatoes through a ricer or food mill with the butter or duck fat, reserving the cooking water if you like. While the potatoes are boiling, bake the mahi mahi fillets for 20 minutes or until flaky.
4. Stir in the artichokes, the reserved oil, the half-and-half, and a splash of vinegar. Taste for seasoning and correct with salt and freshly milled black pepper. To adjust the consistency, add more half-and-half or a little of the potato cooking water.

Thursday, July 1, 2010

Roasted Lemon-Garlic-Rosemary Chicken with String Beans, Caramelized Onions, and Garlic-Rosemary Potatoes Roasted in Duck Fat


Roasting a whole chicken has got to be one of the best ways to cook it, producing tender, juicy, and flavorful meat. It's really the ultimate comfort food! There are countless variations of roasted chicken, but this time, I decided to stick to the tried-and-true classic flavorings of extra-virgin olive oil, rosemary, lemon, and garlic because it brings back fond memories of the lemon-garlic-rosemary rotisserie chicken that my mom used to buy for dinner. I paired it with two equally mouthwatering sides, which worked incredibly well with the chicken: sautéed string beans with caramelized onions (recipe too simple and intuitive to include), and garlic-rosemary potatoes roasted in duck fat. Yum... duck fat. In the culinary world, it's seen as liquid gold - it makes the outside of the potatoes crispy and imparts a rich, savory, out-of-this-world flavor to them that is even better than butter. It's how French fries are traditionally made! Hey, did you know that duck fat is actually lower in saturated fat and higher in polyunsaturated and monounsaturated fats (ie. the good fats) than butter? Although I only mentioned that so I could feel less guilty about eating duck fat... *hangs head*.

A few tips to remember when roasting a chicken:
1. Pick a free-range, organic chicken. It will make a significant difference. Watch 'Food, Inc.' (a documentary about how our food is now being produced), if you haven't already, and you'll be enlightened about the unhealthy conditions that regular mass-produced chickens are raised under! Most of the chickens we consume have been caged inside tiny, overcrowded coops filled with their own feces, fed hormones, antibiotics, and animal by-products (instead of grains, their natural food), and frequently become sick (is it any wonder why that happens?). And horror of horrors, even the sick birds get sent to the factory to be processed - disgusting! These conditions produce chickens that are less moist, less flavorful, and less healthy.
2. Season it ahead of time. If you neglected to buy a free-range/kosher/organic bird, make sure to brine the bird so the meat will remain juicy as it cooks. Otherwise, brining is probably an unnecessary step so just season it and refrigerate for at least an hour. Brining is basically soaking the chicken for several hours or overnight in enough salted water to cover the entire bird and whatever other herbs you decide to toss in for extra flavor. If you care to know how the scientific process of brining works, it basically forces water into the muscle tissues, and when that water flows out, salt flows in and begins to break down some of the proteins in the cells, which in turn creates more room for more water to flow in.
3. Take the chicken out of the refrigerator at least an hour before cooking. A cold bird straight from the fridge won't roast evenly; the outside will cook but the interior will be underdone.
4. Choose the right pan for the job. Roast the chicken in an ovenproof dish or pan that's about the same size as the chicken. If you use a pan that's too large, the juices that accumulate while the chicken is roasting will start to burn and smoke.. unless of course, you're roasting potatoes or other vegetables alongside the chicken in the same pan (I used a separate pan to roast my potatoes).

Roasted Lemon-Garlic-Rosemary Chicken with String Beans, Caramelized Onions, and Roasted Potatoes

Roasted Chicken
Ingredients:
• 1 whole 3-3½ pound baby chicken
• 1 tablespoon sea salt
• ½ teaspoon freshly ground pepper
• a few sprigs rosemary, minced
• 6-8 garlic cloves, peeled
• 1 lemon
For brine:
• ¼ cup sea salt
• a few sprigs rosemary
• 3 garlic cloves, peeled

Directions:
1. Remove any organs from the cavity and reserve for another use. Cut off the wishbone and trim the fat around the edges. If you are brining the bird, skip to step 1a. If not: Rinse the bird with cold water and pat dry. Liberally salt and pepper the entire bird, both inside the cavity and all over the outside surface, including the back, wings, and inner and outer thighs. Carefully loosen the skin from the breast meat, using kitchen scissors if necessary, but take care not to cut through the skin. Pull the leaves from the rosemary sprigs and mince them. Combine the minced garlic, minced rosemary, and salt to form a paste. Spread about 1½ teaspoons of paste in cavity of chicken. Slip half of remaining paste under skin on each side of breast, then, using fingers, distribute paste over breast and thigh by rubbing surface of skin. Cut 1 of the lemons lengthwise into quarters. Place the lemon quarters in the cavity of the chicken. Tie ends of drumsticks together with kitchen twine and tuck wings behind back. Cover and refrigerate for several hours or overnight.
1a. Combine salt, crushed garlic cloves, and rosemary sprigs in 2 cups hot tap water, and let stand 10 minutes to release flavors. Add 1½ quarts cold water and stir until salt is dissolved. Submerge chicken in brine and refrigerate at least 1 hour. Remove chicken from brine and pat dry with paper towels. Cut 1 of the lemons lengthwise into quarters. Place the lemon quarters in the cavity of the chicken. Tie ends of drumsticks together with kitchen twine and tuck wings behind back. NOTE: Keep in mind that the longer you soak the bird in the brine, the saltier the surface will be when you roast it. I soaked it overnight once, and it was way too salty for my taste!
2. Remove the chicken from the refrigerator at least 1 hour before roasting. Preheat the oven to 450°F. Place the chicken, breast up, in a roasting pan or earthenware baking dish, and roast for 10 minutes. Brush the outside of the bird with olive oil and freshly ground pepper. Reduce the oven temperature to 350°F and cook for another 45 minutes, using tongs to turn the bird twice during the cooking. This will circulate the juices and fat and keep the meat moist. The chicken is done roasting when it has turned a medium golden brown and an instant-read thermometer inserted into thickest part of breast and thigh registers about 165 - 175 degrees, respectively. NOTE: You can prepare the vegetables while the chicken is roasting.
3. Transfer chicken to carving board and let rest, uncovered, at least 15 minutes. The juices will settle, the internal temperature will stabilize, and the chicken will be much more succulent than if you carve it immediately. Remove the strings tying the drumsticks together and discard the lemons inside. NOTE: The fat from the juices left in the pan can be converted into a sauce or a gravy.
4. To carve the roasted chicken, slice through the skin between the thigh and breast. Place the bird back in the roasting pan to do this because this will release a lot of juices. Tip the bird forward to drain the juices and then remove it from the pan. Bend or pull the leg out from the body and locate the hip joint with your knife, slicing down firmly through the joint to remove the leg. To remove the drumstick, hold the knob of the drumstick and cut through the joint from the inside. To carve the breast, start at the wishbone at the top of the breast. Slide the point of your knife down each side of the breastbone. Then cut down along the wishbone towards the wings. Slide your knife under the meat, lifting it off the rib cage. Last, holding the meat away from the bird cut down through the wing joint, removing the breast and wing in one piece. Either carve the breast into slices or cut it in half diagonally, making the half with the wing attached slightly smaller. The carcass can be reserved to make chicken stock.

Garlic-rosemary Potatoes Roasted in Duck Fat
Ingredients:
• 2 pounds potatoes, quartered (I like Yukon Gold, but any waxy variety will do; Russet potatoes or other baking potatoes usually fall apart when cooked in duck fat, so they should probably be avoided in this recipe)
• 2-3 cloves garlic, minced
• 1-2 sprigs rosemary, minced
• sea salt, to taste
• freshly ground black pepper, to taste
• 2-3 tablespoons duck fat

Directions:
1. Wash and chunk potatoes. While they're draining in a colander, generously salt the potatoes and shake the colander to evenly distribute the salt. Place the potato chunks into an oven-safe pan and pour the duck fat on top of the potatoes, mixing the potatoes by hand to evenly cover the potatoes. Add the pepper and minced rosemary.
2. Roast them in the oven at 350°F for about 45 minutes, stirring the potatoes every 15 minutes so that the potatoes are evenly browned and the duck fat coats all the potatoes.

Saturday, June 26, 2010

Wild Nettle Frittata


After picking up wild stinging nettles from the Union Square farmer's market this past Saturday, I couldn't help but post another delicious frittata I made. I was surprised at how much I liked the flavor of nettles, and how well they worked with the rest of the ingredients in my frittata. I also stir fried it with diced potatoes, filet mignon tips, and garlic - another simple, yet delicious combination. I love the unique, herby, slightly nutty flavor of nettle, and I'll definitely be back for more!

A bit of background on nettles: Stinging nettles are actually another one of those ignored super veggies, containing the most chlorophyll of any vegetable, 40 percent protein, and higher amounts of vitamins A, C and D, potassium and calcium than spinach. Unfortunately, when handled, they emit formic acid, which causes a painful sting when in contact with bare flesh that can last from a few minutes to 24 hours. So be sure to wear gloves or use tongs when handling raw nettles; once they’re cooked the stinging effect disappears. Also, only use the nettle tops, the stems are so stringy they are sometimes woven into a fiber.

Wild Nettle Frittata
Adapted from Alice Waters' Chez Panisse Café Cookbook

Ingredients:
• 1 pound nettles
• 1 medium onion, thinly sliced
• ¼ cup plus 3 tablespoons extra virgin olive oil
• 3 cloves garlic, minced (I used about 10 garlic scapes)
• ¼ cup Parmigiano-Reggiano cheese
• ¼ cup young pecorino or Sardo cheese
• 6 eggs, lightly beaten
• Salt and pepper

Directions:
1. Wash the nettles thoroughly with gloves on. Sauté the onion in 1 tablespoon olive oil over medium heat. Add another tablespoon of olive oil and the garlic. Season with salt and cook another minute.
2. Add the nettles and turn the heat to high, cooking until nettles are wilted and most of the water they release has evaporated. Drain in a colander and then when cool, chop coarsely.
3. Mix the chopped nettles in a bowl with the cheese and 1/4 cup olive oil. Add the eggs, then salt and pepper to taste.
4. Warm the remaining tablespoon of oil in a large nonstick skillet, and pour in the eggs and nettles mixture, cooking over medium-low until just set and starting to turn brown.
5. Slide the frittata onto a plate and then invert back into the pan. Cook about 13 more minutes until done. Or alternatively, pop it into a 350°F oven for 5-10 minutes, watching carefully to make sure it doesn't burn.

Saturday, June 19, 2010

Fried Soft Shell Crab with Simple Tomato Sauce


It's soft shell crab season, and I couldn't be more excited! Since Father's Day is tomorrow, I'm sure that Papa would have loved this dish, being a huge seafood lover like myself. In fact, maybe that's where I get it from? This guy even eats the green stuff inside large crabs that no one else in the family wants - we leave it for him because we know he will clean that baby out like nobody's business. Anyway, if I were back in California, I would've made this dish for him, but since I'm not, I'm just glad that he got to enjoy not one but three delicious Father's Day meals on Friday, Saturday, AND Sunday. Boy was he excited to tell me about all the delicious things he ate, such as live rock cod and ox tail in Japanese pumpkin and red wine sauce (except he spelled it "source" in the email - hahaha sometimes Papa has NO idea how funny he is!).

Soft shell crab is a bit harder to find than shrimp, prawns, and even lobster, but if you do find them, you MUST get the live version because the frozen kind isn't nearly as flavorful. Thankfully, there were live soft shell crabs at the Union Square Farmer's Market today! I paired this version of panfried soft shell crab, with a simple tomato sauce that is thick, sweet, and packed with tomato flavor. It's a versatile tomato sauce that can go equally well with other kinds of seafood such as mussels, with pasta dishes, for a pizza sauce, or for a dipping sauce for fried calamari. If you do use it for pizza, use the sauce cold or the crust will be compromised. You can also add chopped capers, olives, hot pepper, and anchovies at the end of cooking to give it a special twist. This time I only added arugula, because sometimes simple foods are the most delicious, don't you think? You get to appreciate the purity and flavor of each of the ingredients that way.

Fried Soft Shell Crab with Simple Tomato Sauce
Adapted from Alice Waters' Chez Panisse Café Cookbook

Ingredients:
Soft Shell Crabs
• 6 live soft shell crabs
• extra-virgin olive oil
• ½ teaspoon kosher salt, or more to taste
• ½ teaspoon black pepper, or more to taste
• 1½ teaspoon paprika
• ½ teaspoon cayenne (optional)
• 2 teaspoons garlic powder
• 6 tablespoons hot brown rice cereal

Simple Tomato Sauce

• 2 pounds sweet, ripe greenhouse tomatoes, washed, chopped, and seeded
• 2 tablespoons extra-virgin olive oil
• 3 garlic cloves, peeled and pressed through a garlic press
• 1 large red onion, diced
• 1 teaspoon salt
• Bouquet garni of parsley, thyme, and basil sprigs

Directions:
1. Remove the carapace and lungs of each soft shell crab and rinse with cold water. Pat dry with a paper towel and squeeze out excess water (soft shell crabs are water heavy). Sprinkle salt, pepper, paprika, garlic powder and hot brown rice cereal evenly on each crab.
2. Pan fry each crab in extra-virgin olive oil over medium high heat for about 2-3 minutes per side, flipping them over once to make sure they brown on both sides.
3. Tomato sauce: Warm the olive oil in a sauce pan over medium heat. Cook the onion, stirring occasionally, until softened and slightly browned, about 5 minutes. Add the garlic and let it sizzle for half a minute. Stir in the chopped tomatoes and salt, and add the herb sprigs.
4. Bring the sauce to a boil. Then turn down the heat to low and cook for 30 to 45 minutes at steady simmer, or until the fat floats free from the tomato and the sauce thickens, stirring occasionally.
5. Taste the sauce and add more salt, if necessary.

Saturday, May 15, 2010

Frittata with Lobster, Corn, Potatoes, and Tomatoes


Until last Saturday, I thought green eggs were just a figment of imagination in Dr. Seuss's book 'Green Eggs and Ham' but they really do exist! Apparently, they're from Araucana hens that were bred in South America by the Araucana Indians, and no one knows why eggs from Araucana hens are green. Originally, the eggs from these hens were actually blue but the pure strain of chickens then became adulterated by other strains of chickens as time went on, and now there are a whole range of blue to green colored eggs. Anyhow, I fried up some of the green eggs sunny-side up, my favorite way of making eggs... and WOW, way better than the conventional chicken eggs from the supermarket! It's hard to describe the difference, but the eggs had a distinct, richer flavor. Delicious, and I'll definitely be going back for more, though they are quite expensive for eggs ($5 for half-a-dozen).


Green eggs

This Saturday, I went back to look for more green eggs, but they had sold out. Instead, I bought a dozen pheasant eggs (slightly sweet and more delicate than chicken eggs) and a dozen wild turkey eggs (richer in flavor than chicken eggs though not as rich as duck eggs). Other times, at the same market, I've purchased pullet eggs (eggs from adolescent hens, which had a lighter, more fluffy texture than eggs from older hens) and duck eggs. I love that there's all these exotic eggs at the Union Square farmer's market!


Wild turkey eggs

Pheasant eggs

The Union Square farmer's market also had live lobsters available this time - just my luck! I decided to steam the lobsters, though you could also boil them. And since I currently can't have any heavy cream, butter, or mayonnaise, the usual pairings for any lobster recipe, I decided why not make an exotic frittata with the either the green eggs, pheasant eggs, or wild turkey eggs and pair it with corn, potatoes, tomatoes, and shallots (all ingredients that pair excellently with lobster)? This is not your typical frittata! And unlike other recipes I've had on this site so far, I decided to create my own recipe entirely, so I guarantee you won't find this recipe anywhere else.


A live lobster - he's looking a little irritated right now, but I knew just the solution! I promised to treat him to a nice, relaxing bath... ;)


See? I knew it would work! He had such a nice time, he didn't even want to leave - muahahaha!

Exotic Egg Frittata with Lobster, Corn, Potatoes, and Tomatoes

Ingredients:
• Extra virgin olive oil, as needed
• 5 shallots, minced
• 5 - 6 cloves garlic, minced
• 2 cups fresh corn kernels (about 4 ears corn)
• Salt and freshly ground black pepper
• 2 medium tomatoes, cored and cut into eighths
• 2 medium live lobsters, about 1½ pound each, or 1½ pounds cooked lobster meat, cut into chunks, at room temperature
• 12 eggs

Directions:
1. To prepare the live lobster, there are two methods -
To boil:
Fill a large lobster pot three-quarters full of salted water (use 1 tablespoon of salt for each quart of water). Bring the water to a rolling boil. Put the lobsters in the pot, making sure they're completely submerged. Cover the pot and begin timing, maintaining the boil, as follows:
1 - 2 pound lobsters: approximately 18 minutes
2 pound or larger lobsters: 22 - 25 minutes

To steam:
Put about 2 inches of salted water in a large pot (use 1 tablespoon of salt for each quart of water). Put the lobsters in the pot, and cover tightly. Begin timing, and boil for the times listed above. When the lobsters are done cooking, use tongs to remove them and let them rest in the sink to cool. Let the water continue to boil. When the lobsters are sufficiently cool enough to touch, take a pair of sharp kitchen scissors (they kind that you use to cut whole chickens up) to cut the shell and remove the meat. Cut the meat into bite-size pieces.
2. While you are waiting for the lobsters to cool, wash the skin of the potatoes and place them in the boiling water. Allow about 10-15 minutes for smaller potatoes, about 20 minutes for medium potatoes, and more for larger potatoes to cook thoroughly. When they are done cooking, peel the skin with a vegetable peel and cut them into chunks.
3. Put 2 tablespoons olive oil in a medium saucepan over medium-high heat; a minute later, add shallot or onion and garlic; cook for a minute, stirring occasionally, until soft. Add corn and cook, stirring occasionally, for about 10 minutes, until corn begins to brown and tastes cooked; season with salt and pepper.
4. Crack 3 eggs into a large bowl. Add salt to taste, 2 teaspoons olive oil, black pepper and cayenne pepper (if desired). Beat lightly. Stir the eggs with tomatoes, lobster, shallots, garlic, and corn. I also added a handful of spinach, in this case, but that's optional.
5. Thoroughly preheat a 10-inch oven proof pan over medium-low heat. Pour in 2 tablespoons olive oil. After a few seconds, pour in the egg mixture. As the eggs set on the bottom, lift the edges to allow the uncooked egg to flow underneath. Continue to cook for a couple of minutes, then put the pan in the oven until the frittata is set on top, about 7 to 10 minutes. Cut into wedges and serve warm or at room temperature.

Friday, May 14, 2010

Daring Cook's Challenge: Stacked Green Chile & Chicken Enchiladas


Tomatillos from the farmer's market

Having grown up in California, with a large Mexican population, Mexican cuisine is one of my most loved cuisines. And let me tell you - Mexican cuisine is far more diverse than burritos and tacos. After eating authentic Mexican food, I can't go back to the bastardized-"Mexican" food you would find at places like Taco Bell. Chipotle is not considered that authentic either, although it's clearly a significant step above Taco Bell, and as far as chain restaurants go, I think it's pretty decent. There used to be a Mexican restaurant near where I previously lived called Maz Mezcal that made fresh, homemade tortillas, fantastic shrimp enchiladas, and mouthwatering tamales. You could just tell that their dishes were authentic because some of the dishes I had never even heard of - they actually serve a baby cactus salad there, which previously I didn't know could even be eaten (was decent, as far as I can recall, but I don't know if I feel that I'd have to have it again). And they gave you big portions also. Maz Mezcal was almost always packed, even if it wasn't a Friday or a Saturday, which tells you just how popular the restaurant was; the noise inside it seriously reached deafening proportions, and whenever I ate with someone there, we'd both have to shout to hear each other (a bit annoying). But I still miss that place because there aren't too many good, authentic Mexican restaurants near where I live now, at least not that I know of. Long story short, I haven't had Mexican food in awhile so I was very excited about this month's Daring Cook's Challenge!

At first, I was worried that I wouldn't find some of the ingredients I was looking for, such as Anaheim chiles and tomatillos. But apparently, Anaheim chiles aren't that hard to find, and even if you can't find them, you can substitute some other type of green chile such as Poblano chiles or you can order canned varieties online. And you can find fresh tomatillos at Fairway's on the Upper West Side (74th & Broadway), Garden of Eden markets, Western Beef markets, or occasionally, at the Union Square farmer's market. I also found masa harina, but it wasn't organic, and nowadays I prefer to eat organic foods as much as possible. However, you can order organic masa harina from http://goldminenaturalfoods.com - they carry white, yellow, AND blue corn masa varieties in 1 pound bags (and also other hard-to-find grains and products, such as black quinoa.)

A note about masa harina: it is a must when making corn tortillas from scratch. Any other type of corn flour will not produce the same results at all due to the special way that masa harina is made. To give you a bit of background on masa harina, it's made when corn is dried and then treated in a solution of lime and water, called slaked lime. This does two things: 1) it loosens the hulls from the kernels and softens the corn, and 2) the lime reacts with the corn so that the nutrient niacin can be digested. The soaked maize is then washed, and the wet corn is ground into a dough called masa. When this fresh masa is dried and powdered, it becomes masa harina. I read that fresh masa is even better than masa harina but far more difficult to find.

Anyway, yay for another successful Daring Cook's challenge recipe! Makes me want to try my hand at other chile sauces, tamales, and the famous Mexican mole sauce.

Stacked Green Chile & Chicken Enchiladas

Ingredients:
• 1½ pounds or about eight 6 to 8 inch fresh Anaheim chiles, roasted, peeled, seeds removed, and chopped coarsely*
• 7-8 ounces or about 4-5 medium tomatillos, peeled, stems removed
• 4 cups chicken broth
• 1 clove garlic, minced
• ½ teaspoon kosher salt, or more to taste
• ¼ teaspoon black pepper, or more to taste
• 2 tablespoons cornstarch or ¾ teaspoon xanthan gum, dissolved in 2 tablespoons water for thickening
• Tabasco sauce or your favorite hot sauce (optional)
• 2 boneless chicken breasts (you can also use bone-in chicken breasts or thighs)
• 3 tablespoons extra-virgin olive oil, or more as needed
• Kosher salt and pepper
• 12 small corn tortillas, 5-6 inches in diameter, or if you making your own, 1¾ cups masa harina
• 6 ounces grated Monterrey Jack or other cheese such as cheddar, pepper jack, Mexican cheeses, as long as they melt well and complement the filling (Note: This is not really an optional ingredient, but I omitted it this time due to current dietary restrictions)

*Other green chiles (NOT bell peppers) could probably be substituted but be conscious of heat and size! Anaheim chiles have a heat score of 2500 (Scoville Heat Units) about 2-3/10. Jalapeños have a heat score of 5000 (Scoville Heat Units) about 4-5/10. Thai chiles have a score 150,000 (Scoville Heat Units) 8-9/10 and Habanero chiles have a score of 325,000 to 570,000 9+/10. Anaheim chiles are therefore considered very mild.

Roasted Fresh Chiles

Directions:
1. Put on a pair of disposable latex gloves so as to protect your skin from the chiles - and protect your eyes, in case you accidentally rub them after handling the chiles. (Anaheim chiles are mild in heat, but it's good to wear gloves just to be careful.) Coat each chile with a little olive oil. If you are doing only a couple chiles, using the gas stove works. For larger batches (as in this recipe), grilling or broiling is faster.
2. Lay the oiled chiles on the grill or baking sheet (line pan with foil for simpler clean-up). Place the grill or broil close to the element, turning the chiles so they char evenly. They should be black and blistered. If you do all the chiles at once on a grill or using the broiler, it will take 15-30 minutes, plus time to steam (10 minutes) and time to peel and remove seeds (20 minutes).
3. As they are completely charred (they will probably not all be done at once), remove them to a bowl and cover with plastic, or close up in a paper bag. Let them rest until they are cool.
4. Pull on the stem and the seed core MAY pop out (it rarely does for me). Open the chile and remove the seeds. Turn the chile skin side up and with a paring knife, scrape away the skin. Sometimes it just pulls right off, sometimes you really have to scrape it.
5. DO NOT RINSE!

How to roast Anaheim chiles:
http://www.ehow.com/how_5106125_roast-anaheim-peppers.html

http://www.ehow.com/how_4437304_roast-anaheim-green-chiles-grill.html


Green Chile Sauce

Directions:
1. Put a medium saucepan of water on to boil and remove the papery outer skin from the tomatillos. Boil the tomatillos until soft, about 5-10 minutes. You can also grill the tomatillos until soft, about 2-5 minutes. You could also broil them, for about 8-12 minutes. This can be done the same time the chiles are roasting.
2. Drain and puree in a blender or food processor for a few seconds.
3. Return the tomatillos to the saucepan along with the chicken broth, chopped green chiles, minced onion, oregano, garlic, salt and pepper.
4. Bring to a boil over medium-high heat and then reduce the heat and simmer for 10 minutes.
5. Add the cornstarch/water mixture and stir well. Simmer, stirring occasionally, until the sauce is thickened and reduced to 4-5 cups, another 10-15 minutes.
6. Adjust seasonings and add hot sauce if you want a little more heat.


Stacked Green Chile and Grilled Chicken Enchiladas

Directions:
1. Heat a gas grill to medium high or build a medium-hot charcoal. Coat the chicken with olive oil and season well with salt and pepper. Preheat oven to 450°F.
2. Grill the chicken until just cooked through, 4-6 minutes per side for boneless chicken breasts and longer for bone-in chicken pieces. If you roast your chicken, a bone-in breast takes about 30 minutes (depending on size). Be sure chicken is done but not overcooked, since it will be in the oven in the last stage of the recipe.
3. Cool and then slice into thin strips or shred.
4. In a small skillet, heat 3 tablespoons oil over medium-high heat until very hot. Dip the edge of a tortilla into the oil to check – it should sizzle immediately.
5. Using tongs, put a tortilla into the pan and cook until soft and lightly brown on each side, about 15-20 seconds per side (at the most).
6. Drain on paper towels.
7. Add oil as needed and continue until all 12 tortillas are done.
8. In a baking dish large enough to hold four separate stacks of tortillas, ladle a thin layer of sauce.
9. Lay four tortillas in the dish and ladle another ½ cup of sauce over the tortillas.
10. Divide half the chicken among the first layer of tortillas, top with another ½ cup of sauce and a third of the grated cheese.
11. Stack another four tortillas, top with the rest of the chicken, more sauce and another third of the cheese.
12. Finish with the third tortilla, topped with the remaining sauce and cheese.
13. Bake until the sauce has thickened and the cheese melted, about 20 minutes. Let rest for 5-10 minutes.
14. To serve, transfer each stack to a plate. Spoon any leftover sauce over the stacks. The stacks may also be cooked in individual gratin dishes.

For how to make juicy grilled chicken:
http://kalynskitchen.blogspot.com/2007/05/how-to-make-juicy-grilled-chicken.html

Corn Tortillas

From Rick Bayless’s Mexican Kitchen

Ingredients:
• 1¾ cups masa harina, makes about 15 tortillas
• 1 cup plus 2 tablespoons hot water

Directions:
1. Pour hot water over masa harina, cover and let sit 30 minutes. Add (additional) cool water 1 tablespoon at a time until the dough is soft but not sticky. Divide the dough into 15 balls and cover with plastic wrap.
2. Heat a large (two burner) ungreased griddle or two large skillets, one on medium-low and one on medium-high.
3. Put a ball of dough between two sheets of plastic. If you don’t have a tortilla press, press to a 5-6 inch circle using a heavy frying pan or bread board or other heavy, flat object. Put the tortilla into the cooler pan or cooler end of the griddle. The tortilla will probably stick, but within 15 seconds, if the temperature is correct, it will release. Flip it at that point onto the hotter skillet/griddle section. In 30-45 seconds, it should be dotted with brown underneath. Flip it over, still on the hot surface and brown another 30 seconds or so. A good tortilla will balloon up at this point. Remove from heat and let them rest while cooking the remaining tortillas. Use quickly.

For how to make corn tortillas:
http://www.youtube.com/watch?v=JDegTyqL55o

http://www.youtube.com/watch?v=Qm6_iAZ-CCA&NR=1

http://www.youtube.com/watch?v=JFn3GKVLHnM&NR=1

http://simplyrecipes.com/recipes/how_to_make_corn_tortillas/


For how to make flour tortillas:
http://www.mangiodasola.com/2009/09/tortillas-de-harinaflour-tortillas.html

http://www.texasrollingpins.com/tortillarecipe.html
http://www.youtube.com/watch?v=LEz0puaKNTk

http://www.rickbayless.com/recipe/view?recipeID=207

http://homesicktexan.blogspot.com/2007/03/and-end-to-my-quest-flour-tortillas.html

Wednesday, April 14, 2010

Daring Cook's Monthly Challenge: Brunswick Stew


I recently joined the Daring Cooks, a group of cooks/food bloggers that cook a certain recipe chosen by the host of the month. The 2010 April Daring Cooks challenge was hosted by Wolf of Wolf’s Den. She chose to challenge Daring Cooks to make Brunswick Stew. Wolf chose recipes for her challenge from The Lee Bros. Southern Cookbook by Matt Lee and Ted Lee, and from the Callaway, Virginia Ruritan Club.

Since the recipe calls for rabbit, I knew I would need to head down to the local farmer's market at Union Square, where you can find all sorts of uncommon foods not normally found in grocery stores. Unfortunately, I didn't find rabbit and was told at the manager's station that "the rabbit guy" comes in the early summer. So instead, I bought turkey thighs, which I was told had a similar flavor and texture as rabbit once it's cooked in a stew. I also substituted smoked turkey bacon for bacon and frozen corn for fresh corn. It took quite a bit of work to make this stew, but it was worth it - delicious served over brown rice with a side of cornbread!

Brunswick Stew
From Matt Lee and Ted Lee's The Lee Bros. Southern Cookbook: Stories and Recipes for Southerners and Would-Be Southerners

Ingredients:
• ¼ pound or 4 ounces slab bacon, rough diced (I used turkey bacon)
• 2 Serrano, Thai or other dried red chiles, stems trimmed, sliced, seeded, flattened (I used Jalapeño chiles)
• 1 pound rabbit, quartered, skinned (I used turkey thighs, as I could not find rabbit)
• 1 4-5 pound chicken, quartered, skinned, and most of the fat removed
• 1 tablespoon sea salt for seasoning, plus extra to taste
• 2-3 quarts or 8-12 cups Sunday Chicken Broth (I substituted canned chicken broth)
• 2 bay leaves
• 2 large celery stalks
• 2 pounds Yukon Gold potatoes, or other waxy type potatoes, peeled, rough diced
• 1½ cups or about 5 small carrots, chopped
• 3½ cups or about 4 medium onions, chopped
• 2 cups or about 4 ears fresh corn kernels, cut from the cob
• 3 cups butterbeans, preferably fresh (1¼ pounds) or defrosted frozen
• 1 35-ounce can or 4 cups whole, peeled tomatoes, drained
• ¼ cup red wine vinegar
• Juice of 2 lemons
• Tabasco sauce to taste

Directions:
1. In the largest stockpot you have, preferably a 10-12 quart or even a Dutch Oven if you’re lucky enough to have one, fry the bacon over medium high heat until it just starts to crisp. Transfer to a large bowl, and set aside. Reserve most of the bacon fat in your pan, and with the pan on the burner, add in the chiles. Toast the chiles until they just start to smell good, or make your nose tingle, about a minute tops. Remove to bowl with the bacon.
2. Season liberally both sides of the rabbit and chicken pieces with sea salt and pepper. Place the rabbit pieces in the pot and sear off all sides possible. You just want to brown them, not cook them completely. Remove to bowl with bacon and chiles, add more bacon fat if needed, or olive oil, or other oil of your choice, then add in chicken pieces, again, browning all sides nicely. Remember not to crowd your pieces, especially if you have a narrow bottomed pot. Put the chicken in the bowl with the bacon, chiles and rabbit. Set it aside.
3. Add 2 cups of your chicken broth or stock, if you prefer, to the pan and basically deglaze the pan, making sure to get all the goodness cooked onto the bottom. The stock will become a nice rich dark color and start smelling good. Bring it up to a boil and let it boil away until reduced by at least half. Add your remaining stock, the bay leaves, celery, potatoes, chicken, rabbit, bacon, chiles and any liquid that may have gathered at the bottom of the bowl they were resting in. Bring the pot back up to a low boil/high simmer, over medium/high heat. Reduce heat to low and cover, remember to stir every 15 minutes, give or take, to thoroughly meld the flavors. Simmer, on low, for approximately 1½ hours. Supposedly, the stock may become a yellow tinge with pieces of chicken or rabbit floating up, the celery will be very limp, as will the chiles. Taste the stock, according to the recipe, it “should taste like the best chicken soup you’ve ever had”.
4. With a pair of tongs, remove the chicken and rabbit pieces to a colander over the bowl you used earlier. Be careful, as by this time, the meats will be very tender and may start falling apart. Remove the bay leaf, celery, chiles, bacon and discard. (I didn't remove the bacon, as I thought it was a waste of bacon.) After you’ve allowed the meat to cool enough to handle, carefully remove all the meat from the bones, shredding it as you go. Return the meat to the pot, throwing away the bones. Add in your carrots, and stir gently, allowing it to come back to a slow simmer. Simmer gently, uncovered, for at least 25 minutes, or until the carrots have started to soften.
5. Add in your onion, butterbeans, corn and tomatoes. As you add the tomatoes, crush them up. Simmer for another 30 minutes, stirring every so often until the stew has reduced slightly, and onions, corn and butterbeans are tender. Remove from heat and add in vinegar, lemon juice, stir to blend in well. Season to taste with sea salt, pepper, and Tabasco sauce if desired.
6. You can either serve immediately or refrigerate for 24 hours, which makes the flavors meld more and makes the overall stew even better. Serve hot, either on its own, or with a side of corn bread, over steamed rice, with any braised greens as a side.

Saturday, March 20, 2010

Mixed Microgreens Salad with Soft Cheese, Toasted Almonds, and Poached Duck Egg


Poaching eggs is a lot more difficult than it seems. There are numerous different methods: with or without salt, with or without vinegar, in plastic wrap (as shown here ) or dropped into water that has been stirred creating a "tornado". It will take some practice before I get good at poaching eggs because you have to get the timing exactly right and make sure that the egg keeps together when it cooks. However, I'm very pleased with the flavor of duck eggs - it's stronger than that of chicken eggs, just as duck meat is stronger in flavor than chicken meat (at least the white meat). The other difference is that duck eggs are larger in size. So far, I have been poaching the duck eggs, but in the future, I plan to experiment with baking with them in cookies or cakes, or using them in other recipes that require eggs. But first, I want to get poaching them down - I feel like it's one of those basic skills that a chef or a good home cook has to master.

Mixed Microgreens Salad with Soft Cheese, Toasted Almonds, and Poached Duck Egg

Ingredients:
• 1 pound mixed microgreens (pea shoots, micro mesclun, etc)
• ½ cup soft white cheese, crumbled
• ½ cup toasted almonds
• 1 tablespoon black pepper
• 1 tablespoon salt
• 3 tablespoons extra-virgin olive oil
• 2 tablespoons balsamic vinegar
• 4 free-range duck eggs
• a pinch of paprika

Directions:
1. Wash and spin the microgreens to get rid of excess water.
2. Bring a pan of cold water to a boil and stir the water, creating a "tornado". Drop an egg into the center of the tornado and cook for 4-6 minutes, depending on how running you want the yolk to be. Remove the egg from the heat and drop it into a bowl of ice water, to stop the cooking.
3. Dress the microgreens with a mixture of olive oil and balsamic vinegar, then sprinkle with almonds. Place a poached duck egg on each salad, and add a pinch of paprika. Season the entire salad with salt and pepper, according to taste.

Wednesday, March 17, 2010

Duck Confit with Creamy White Beans


I love love love French food. The French have definitely earned their place as one of the world's most delicious cuisines. They are huge fans of duck, one of my favorite meats, if you couldn't already tell (I have a relative who started a successful duck farm, knowing he would make good business among the French)... and duck confit is one of my favorite preparations of duck (another favorite is the famous Chinese dish of Peking duck). It's also one of my man♥'s favorite meals, of all the meals I've prepared for him. Anyhow, the leftover duck fat keeps for at least 6 months in the refrigerator, provided that you strain it properly after cooking with it, and is wonderful for frying vegetables, potatoes, and steak with. Another thing I love about duck confit: The confit process takes about two days, but once prepared, the duck will keep in the refrigerator for two to three weeks! I paired the duck confit with creamy white beans. Any leftover beans can be used as a spread for toast!

Duck Confit with Creamy White Beans
Adapted from Alice Waters' Chez Panisse Café Cookbook

Duck Confit
Ingredients:
• 6 duck legs (drumsticks and thighs, attached)
• 6 bay leaves, crumbled
• 4 juniper berries, crushed
• 1 tablespoon dried thyme
• 6 tablespoons salt
• 1 teaspoon cracked black peppercorns
• 3 quarts rendered duck fat or homemade lard

Directions:
1. Trim the duck legs of excess fat, leaving the skin intact. Make a small incision at the base of each leg, severing the tendon and cutting through the skin all around the bone. Combine the salt, bay leaves, juniper berries, thyme and pepper, and season each leg generously with the mixture. Cover and refrigerate overnight.
2. The next day, melt the duck fat over medium heat in a large, wide, heavy-bottomed pot. Gently slip the duck legs into the fat, making sure they're completely submerged. Raise the heat slightly. Stir with a wooden spoon as the fat comes up to temperature. Adjust the flame to maintain the barest simmer the fat should never boil, but should swirl lightly sending up the occasional small bubble.
3. Cook the duck legs, uncovered, for about 1½ hours. Test a leg for doneness by inserting a skewer into the thickest part of the drumstick; they should be almost falling apart. Carefully transfer the duck legs to a dish. Ladle the duck fat over the legs, making certain they are covered by an inch of fat. Cool the legs in the fat, then cover and refrigerate for up to 3 weeks.
4. When you are ready to eat the duck legs, heat a cast=iron skillet over medium heat. Add the duck legs in one layer, skin side down, and cook over medium heat until crisp and brown, about 5 minutes. Turn the legs and cook for an additional 4 to 5 minutes.

Creamy White Beans
Ingredients:
• 3 cups cannellini beans
• bouquet garni of parsley, thyme, and bay leaf
• 2 medium onions, diced fine
• 2 carrots, peeled and cut into chunks (optional)
• salt
• 4 garlic cloves, chopped fine
• red pepper flakes (optional)
• 1 teaspoon fennel seed, finely powdered
• 2 teaspoons rosemary, chipped fine

Directions:
1. Soak the beans overnight in water to cover. The next day, drain the beans and put them into a large heavy-bottomed pot.
2. Add the bouquet garni, cover with water, and bring to a boil. Reduce the heat to a simmer, and skim any foam that has risen to the surface. When the beans begin to soften, after an hour or so, add a generous amount of salt and continue to cook gently until they are very tender. When they are fully cooked, remove from the heat.
3. While the beans are cooking, heat a sauté pan and add enough olive oil to coat the bottom of the pan. Add the onion and carrot, season with salt, and cook over medium heat until tender. Set aside.
4. Purée 1 cup of the cooked beans in a blender with a little of their cooking liquid. Drain the remaining beans, reserving the liquid, but discarding the bouquet garni. Heat a large sauté pan and coat the bottom with olive oil. Add the garlic and a pinch of red pepper, and warm briefly before adding the diced onion and carrot, the bean purée, beans, powdered fennel seed, and rosemary, if you wish. Cook over medium heat, stirring occasionally, until the beans are hot. If the consistency seems too thick, thin with some of the reserved bean cooking liquid. Taste and season with salt as necessary. Finish with a generous drizzle of extra-virgin olive oil and serve.

Thursday, February 25, 2010

Slow-Cooked Wild King Salmon with Shallots-Basil Topping


My favorite way to cook to wild salmon is to slow cook it - this is by far, the most moist, tender version of salmon I've ever had! It's also really easy to make, and you just pop it into the oven and let the oven do all the work. This salmon is so delicious, it doesn't even really need any fancy sauces or toppings; it's wonderful just by itself with some olive oil drizzled on top and good ol' salt and pepper. You don't want to overwhelm the beautiful flavor of wild salmon, so if you do make a topping, you want to go easy!

Here are some ideas for salmon flavorings:
-add honey or fresh fruit for some sweetness: honey, turmeric, and powdered fennel seed is a possibility, or you could go for a tropical fruit salsa with finely diced mango, strawberries, pineapple, tomato, and apple (or whatever fresh fruits are in season; a great summertime version would be avocado, peach, and plum), a dash of salt and pepper, and freshly squeezed lime juice.
-a bit of spiciness: chili powder or cayenne
-a savory herb topping: shallots and fresh chiffonade basil (a personal favorite)
-a citrus topping: fresh dill and freshly squeezed lemon, for example
-a crunchy topping: brown rice cereal, crushed almonds or other nuts, etc
-aioli (a garlic-infused mayonnaise): to be spread on the salmon after it is done cooking

In the pictured version, I went with wild king salmon seasoned with salt and pepper, and a bit of olive oil drizzled on top with a side of tomatoes, green beans, and brown rice. However, other types of salmon are delicious too. Here is a summary of the different wild salmon types I've tried: Alaskan king (Chinook) salmon has a firm flesh, a red color, and are high in oil content, resulting in an extra-rich flavor, which is highly prized among salmon-lovers. I've also tried Copper River king salmon, which was absolutely delicious but ridiculously expensive. Sockeye (red) salmon also has a rich flavor due to its high concentration of oils and a rich red, firm flesh that maintains its color throughout cooking, as you can see in the photo. Coho (silver) salmon has a mild and sweet taste, slightly milder than that of the Sockeye, and the flesh is leaner, firmer, and has a more delicate texture than other salmon. Steelhead Trout (which is technically a type of Rainbow Trout, rather than a type of salmon, but is so similar in color, taste and texture to salmon that it is often categorized as salmon) has a tender flesh and a mild, somewhat nutty flavor. I personally tend to prefer the oilier, richer-tasting types of salmon.

Slow-Cooked Wild King Salmon with Shallots-Basil Topping
Adapted from Alice Waters' Chez Panisse Café Cookbook

Ingredients:
• 1 king salmon fillet, 0.3-0.4 lb
• extra-virgin olive oil
• salt
• pepper
• for the salmon topping: finely sliced shallots and fresh chiffonade basil (chiffonade means "to shred", where you slice an herb into long, thin strips), or any other topping you prefer

Directions:
1. Preheat the oven to 250°F, and place a pan of water on the lowest rack in the oven, which will create a humid environment to keep the salmon moist.

2. Lightly brush or spray a baking pan with olive oil, or alternatively, wrap a baking pan with aluminum foil (good for you lazy dish washers...) Brush the salmon with olive oil and season generously with salt and freshly ground pepper and place the topping of your choice on the salmon. Place the salmon in the baking dish and put it in the oven for about 30 min. The salmon is cooked when the juices are beginning to collect on top of the fillet and fat is starting to ooze out of its sides; the color was remain essentially the same, so don't judge by the color!

3. Let the salmon rest for at least 10 min at room temperature.

Sunday, February 21, 2010

Heirloom and Cherry Tomato Salad


Tomatoes are one of those vegetables that I enjoy both raw and cooked, probably because they're naturally sweet. And who doesn't like tomatoes? I've never heard anyone say they don't like tomatoes, whereas other vegetables have their fair share of fans as well as non-fans. This tomato salad takes advantage of the many different varieties of tomatoes, including -- mini heirloom tomatoes of all different colors; large heirloom tomatoes on the vine, and cherry tomatoes.

Heirloom and Cherry Tomato Salad
From Alice Waters' Chez Panisse Café Cookbook

Ingredients:
• 1 (½-pint) basket assorted cherry tomatoes
• 2 pounds heirloom tomatoes, different colors and sizes
• 1 shallot, diced fine
• 2 tablespoons red wine vinegar (I used balsamic vinegar instead)
• 1 garlic clove, smashed
• Salt
• ½ cup extra-virgin olive oil
• Pepper
• Green and purple basil leaves, chopped
• Lemon cucumbers and torpedo onions (optional)

Directions:
1. Stem the cherry tomatoes and cut them in half. Core the larger tomatoes and cut them into slices or wedges.
2. For the vinaigrette, macerate the shallot in the vinegar with the garlic and a little salt. Whisk in the oil. Taste and adjust the acidity and salt as necessary. Put the tomatoes in a shallow salad bowl or on a platter. Season with salt and pepper, strew on the chopped basil leaves, and carefully dress with the vinaigrette.
3. (optional) Thin slices of peeled lemon cucumber and torpedo onion are wonderful additions to the salad.
4. For a more elegant tomato salad, slice perfectly ripe heirloom tomatoes and arrange them on a platter. Season with salt and pepper, a splash of good Champagne, and a generous drizzle of extra-virgin olive oil.

Friday, February 19, 2010

Butternut Squash, White Bean, and Kale Chicken Soup


As promised, here's another great way to prepare a winter squash. This soup recipe is so simple, yet flavorful, hearty, and satisfying, it's the perfect comfort food for a cold winter day in New York City! And it is definitely still winter time over here. I seriously can't believe spring officially starts in 9 days. Just last week (on Wednesday, February 10th), all NYC public schools and Catholic elementary and middle schools were closed due to the snow. By the way, maybe only New Yorkers will know what I'm talking about, but you know those patches of snow that look deceivingly stable, yet when you step on them, your feet are instantly plunged into this freezing, nasty, dirty, black water that the snow was just floating on top of? Yeaaa, I stepped on a couple of those. $%$%@#$$#@$! Oh well, nothing a hot shower and a bowl of chicken soup can't cure...

Butternut Squash, White Bean, and Kale Chicken Soup

Ingredients:
• 1 cup dried cannellini beans or 2 15-ounce cans of cannellini beans (possible substitutions: navy beans or Great Northern Beans)
• 2 tablespoons extra virgin olive oil
• 2½ pounds chicken breast or thighs (bone-in chicken has more flavor, just remove the bones later, but boneless chicken is obviously more convenient to use; or alternatively, you could use some other type of meat - spicy Italian sausage would work well)
• 2 yellow onions, diced
• 6 cloves garlic, minced or pressed through a garlic press
• 5 cups chicken broth, preferably homemade chicken stock
• 6 ounces white wine (optional)
• 2 inch piece kombu seaweed (I used canned cannellini beans that already contained kombu seaweed)
• 1 teaspoon salt
• ½ teaspoon pepper
• 4 sage leaves
• 2 sprigs thyme or rosemary
• 2 bay leaves
• 1 large butternut squash, about 4½ pounds, peeled and chopped into ½-inch cubes (Helpful tip: butternut squash can be peeled using a normal swivel-headed vegetable peeler)
• ½ cup garlicky kale, or ¾ pound lacinato kale before cooked
• slices of country-style bread with garlic and olive oil spread (optional)

Instructions:
1. If you are using dry cannellini beans, soak the 2 cups of cannellini beans overnight in water, or alternatively, quick-soak the cannellini beans using the following method: First pick through the beans to remove small stones and other foreign materials. Place them in a large stock pot and add water (6 - 8 cups of water per pound of beans.) Boil vigorously for 3 minutes. Then turn off the heat, cover the pot and let it sit for at least an hour, which will usually be enough time to soften the beans sufficiently. Soaking the beans allows shorter cooking times, which preserves the most nutrients, and also allows for the beans to cook more evenly and completely.
2. After the beans are soaked, drain them and put them in a large stock pot along with the chicken stock. (Never cook with the same water that you soaked the beans in because this soaking liquid is dirty.) Bring to the boil, then lower the heat and simmer until the beans are tender. Start checking after 45 minutes. Taste, and if necessary, adjust the seasonings.
3. Meanwhile, heat the olive oil in a large sauté pan. Add chicken and brown about 15 to 20 minutes.
4. Remove the chicken to the stock pot and add the onion, sage leaves, rosemary/thyme sprigs, and bay leaves to the sauté pan. Sauté on medium heat about 10 minutes. Add butternut squash and garlic, and sauté for another 5 minutes.
5. Remove the vegetables and herbs to the stock pot, and add wine, kombu seaweed, salt, pepper, and bring to a boil; simmer about 45 minutes to 1 hour or until the squash gets very soft.
6. (optional) Stir in garlicky kale. Serve hot soup over thickly sliced country-style bread that has been brushed with minced garlic and extra virgin olive oil and toasted in the oven until crisp and golden brown.