Friday, August 20, 2010

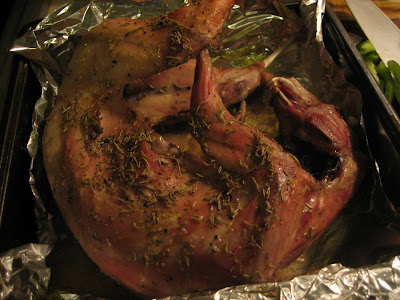
Roasted Garlic-Rosemary Rabbit


Rabbit is one of those meats that when people have for the first time, they say "hey it tastes just like chicken". Although it does taste similar to chicken and is cooked in the same way, it actually has a milder flavor and is more tender. The rabbit is best roasted and eaten almost immediately, since it's a particularly lean meat and therefore dries out easily. It has the highest percentage of protein and lowest percentage of fat compared to chicken, veal, turkey, lamb, beef, and pork at 20.8% protein and 4.5% fat. It's a very healthy and delicious meat, though difficult to find - I chanced upon mine at the Union Square Greenmarket last Friday when John Fazio Farms was there selling rabbits and ducks, but as far as I know, they're only there in the summertime. By the way, as with chicken, you'll want to choose a smaller size rabbit since the younger the rabbit was when it was killed, the more tender and succulent the meat will be.

Since this was my first time cooking rabbit, I was a little nervous, but I'm glad I gave it a shot because I was pleased with the results! The Zuni Cafe Cookbook has a recipe for rabbit sausage which I may just have to try making (that is, if I can actually find lamb casings.)

Roasted Garlic-Rosemary Rabbit

Ingredients:
• 2½-2¾ pound whole rabbit
• 10 small garlic cloves, peeled and pressed through a garlic press
• 6 tablespoons extra-virgin olive oil
• salt and freshly ground black pepper, to taste
• 2 sprigs fresh rosemary, or 1-1½ teaspoon dried rosemary
• ¼ cup white wine
• 3 tablespoons lemon juice

Directions:
1. Preheat oven to 325°F. Rinse and dry the rabbit thoroughly. Rub it all over - both the inside and the outside - with the garlic, rosemary, salt, pepper, and olive oil.
2. Place the rabbit in a shallow roasting pan, just large enough to hold it comfortably, and roast it in the oven for 30 minutes. Remove the rabbit from the oven and pour the wine and lemon juice over it, if you desired. Also, baste the rabbit with its own juices (it helps if you have a baster). Cover it loosely with foil, and continue roasting for l hour, turning it every 15 minutes and basting it with the pan juices.
3. After an hour, increase the oven temperature to 450°F and uncover rabbit. Roast for another 15 minutes, or until deep golden brown. Baste often with the pan juices to keep meat succulent, turning once or twice for even coloring.
4. Use poultry shears to cut rabbit into serving pieces. Arrange on the platter with sprigs of rosemary, and drizzle the rabbit with its pan juices, if desired.

Wednesday, August 18, 2010

Ribeye Steak with Salmorigano and Haricot Yaune


I was so excited when the Zuni Cafe Cookbook arrived in the mail yesterday because it's won the James Beard Foundation Cookbook of the Year award and IACP Cookbook of the Year award. Also, the restaurant won the James Beard Foundation Restaurant of the Year, and Judy Rodgers (who founded Zuni Cafe and wrote the book) won the James Beard Foundation Best Chef of the Year award. Not only do the recipes look delicious, the cookbook is very well-written and include many helpful details for the home cook, a glossary for ingredients, and even wine pairings for each main course (a nice touch for those who drink alcohol, though I currently can't). It's also a natural transition from the Alice Waters style cooking that I've been doing for the past year or so - French and Italian influenced Californian cuisine with a focus on fresh, seasonal, and organic/natural ingredients. Judy Rodgers actually interned at Chez Panisse at one time before she started Zuni Cafe.

The first recipe I decided to make was salmorigano, which is a salsa-marinade that can be used for marinating meat, or as a sauce for cooked food, such as fish or roasted or grilled vegetables (tomatoes, peppers, onions, eggplant, etc), or even as a sauce for grilled bread. It's traditionally made with fresh oregano, but this version of it uses dried oregano. I used salmorigano to marinate pieces of ribeye (one of my favorite cuts of meat) overnight - it definitely didn't disappoint! I paired the ribeye with haricot yaune (the yellow version of haricot vert) which was sauteed with onions and lavendar peppers.


Black and lavendar peppers from the Union Square Greenmarket

A few tips when buying steak: a) Look for lots of marbling (thin threads of fat throughout the meat) - marbling means fat which means flavor b) It should be about 1-1½ inches thick so that it doesn't dry out while it's being cooked c) Grass fed, naturally raised beef is your best quality meat, but if not, go for USDA Prime; and if not Prime, then Choice (one level below Prime). d) The best cuts are filet mignon or tenderloin (the most tender and expensive cut, though not the most flavorful), ribeye (well marbled, one of the juiciest and most flavorful cuts), New York Strip (best cut for grilling), Porterhouse (a combination of New York Strip steak on one side and tender filet on the other), and T-bone (very similar to a Porterhouse steak, except with less of the tenderloin muscle.)

Ribeye Steak with Salmorigano and Haricot Yaune
Adapted from The Zuni Cafe Cookbook

Ingredients:
• 4 ribeye steaks, 1-1½ inches thick, about 10 ounces each

• 1 pound haricot yaune, washed and stems trimmed (or if you can't find them, substitute haricot vert)
• 1 bell pepper, washed diced (I used lavender pepper, but you can use any color - preferably red, orange, or yellow, as green ones lend a bitter rather than sweet flavor)
• 1 red onion, peeled and diced

Salmorigano
• 12 small garlic cloves
• About 1½ cup extra-virgin olive oil
• ¾ teaspoon salt
• ¾ teaspoon freshly ground black pepper or chili pepper flakes\
• 3 tablespoons dried oregano
• 1½ lemons, halved
• 6 tablespoons simmering water

Directions:
1. Remove your steak from the refrigerator at least 30 minutes before you plan to cook it and allow it to come to room temperature, since a cold steak will contract when it hits the heat and cause it to toughen. Preheat your oven to 425°F.
2. Salmorigano: Peel and crush the garlic in a garlic press. Add a pinch of salt, then add the oregano, oil, and black pepper or dried chili. Stir the mixture to combine. Just before using, add the simmering water, squeeze in the lemon juice, whisk, and taste. The sauce shouldn't be too tart or sour so as to overwhelm the other flavors. If you're using it as a marinade, allow each piece of steak to soak in the mixture for up to 1 hour.
3. Haricot Yaune: Sauté the onion in a non stick pan on medium high heat for about 10 minutes until it begins to caramelize. Then add the haricot yaune and sauté for 10 minutes more until they are soft. (I prefer them a bit on the softer side, so sauté for 6 or 7 minutes if you prefer them a little crunchy.)
4. Preheat a skillet to medium high heat. When it's hot, drop the steak in the skillet and sear each side for 30-45 seconds, depending on its thickness. Then place the steak in the oven for about 10-12 minutes, again depending on its thickness - this will produce a medium rare steak, so leave the steak in for longer if you prefer a steak that's more well done. Remove the steak and allow it to rest for about 5 minutes to let the juices settle before serving with a side of haricot yaune and caramelized onions.

Wednesday, August 11, 2010

Wild Mussels in Heirloom Tomato Basil Sauce


Hello hello! So if you've been following along in my blog, I'm sure you've noticed that many of my most recent entries are of seafood - however, surprisingly, I still haven't done an entry on any type of small shellfish, such as clams, mussels, shrimp, and oysters. Nothing beats the taste of fresh shellfish, so it's about time for this simple but yummy recipe for wild mussels! You do have to be careful in the summer months to make sure these sea creatures remain as fresh as possible though. When I buy them at the local farmer's market, I always remember to ask them to give me a bag of ice, just to make absolute sure that the seafood stays fresh on my way home. And they really have to be eaten within 2 days max; the sooner you eat them, the better. I had bad mussels once (past 2 days of purchase) and my stomach complained about it for hours afterwards; that was NOT fun. Oh and one other thing, mussels are always sold live and they need to breathe. So when you get home, whatever you do, don't put them in an airtight container or the vegetable drawer or they will all suffocate, and a dead mussel is not a mussel you want to eat.

The sauce is a riff of the simple tomato sauce I'd posted earlier except this time, I stirred in some fresh basil a couple minutes before I turned off the heat. I also used the most delicious heirloom tomatoes from the Union Square farmer's market - look at all the variety (there's even purple tomatoes)!


Anyhow, as my 5th grade teacher used to say before lunch (funny how I still remember this but I'll forget stuff that happened yesterday)... Bon appetit, time to eat! :)

Wild Mussels in Heirloom Tomato Basil Sauce

Ingredients:
• 4 pounds mussels, scrubbed and debearded

Simple Tomato Sauce

• 2 pounds sweet, ripe greenhouse tomatoes, washed, chopped, and seeded
• 2 tablespoons extra-virgin olive oil
• 3 garlic cloves, peeled and pressed through a garlic press
• 1 large red onion, diced
• 1 teaspoon salt
• Fresh basil
• Fresh parsley (optional)

Directions:
1. Tomato sauce: Warm the olive oil in a sauce pan over medium heat. Cook the onion, stirring occasionally, until softened and slightly browned, about 5 minutes. Add the garlic and let it sizzle for half a minute. Stir in the chopped tomatoes and salt.
4. Bring the sauce to a boil. Then turn down the heat to low and cook for 30 to 45 minutes at steady simmer, or until the fat floats free from the tomato and the sauce thickens, stirring occasionally.
5. Taste the sauce and add more salt, if necessary. Stir in the fresh basil and turn off the heat after a couple minutes.
6. Hold each mussel under cold running water. Use a brush with stiff bristles to thoroughly scrub the mussel and remove grit, sand, and mud from the shell's exterior. Wild mussels usually have a dark, shaggy beard extending from each shell. After scrubbing each mussel, pull the beard away from the shell until taut, and then pull the beard down sharply toward the dark hinge. It should snap away easily. Removing its beard will kill the mussel, so perform this step just before cooking them.
7. Add the mussels, cover, and stream until they are open, about 5-7 minutes. Shake the pot, holding down the lid with a kitchen towel, to redistribute the mussels. Discard any mussels that do not open because this indicates that they have died. Place the mussels in a plate, then pour the warm tomato basil sauce over them. Garnish with fresh parsley, if you wish.